Showing posts with label Sides. Show all posts

Friday, October 14, 2011

Baby Greens with Warm Goat Cheese

I used to not like goat cheese. For some reason, it intimidated me. I'm not sure if it was because it was from a goat or if the flavor was just too strong, but there was something about it that scared me off. I think the trick to goat cheese is just to keep it simple. Since the flavor is so pungent, you want to make sure to serve it with either light ingredients or other bold flavors that can stand up against it.

My lovely mother-in-law was up to visit us a few weeks ago, and the hubs wanted to make her a meal that impressed. He was in charge of the main entree and left the appetizer and salad up to me. I wanted to serve something that was complimentary to his scallops and risotto, when I came across this warm goat cheese salad from Epicurious, I thought it was the perfect pairing. The warmth of the goat cheese is just delicious against the crisp of the baby greens and the tang of the vinaigrette.

Tip: When cutting the goat cheese, use dental floss. Simply wrap each end around your finger like you're going to floss your teeth, instead cutting the goat cheese with the string. This will give you the round pieces you'll want without the crumbling that you'll get when using a knife. 


Baby Greens with Warm Goat Cheese
adapted from Epicurious
1 large egg white
1 teaspoon water
2 (1/3-inch-thick) rounds soft mild goat cheese, cut from a cold log
2 tablespoons panko bread crumbs
1 teaspoon cider vinegar
1/8 teaspoon salt
1/8 teaspoon Dijon mustard
Pinch of sugar
1 tablespoon plus 1 teaspoon extra-virgin olive oil
2 cups mesclun (mixed baby salad greens; 1 oz)
1/4 cup sliced almonds

Whisk together egg white and water. Dip cheese rounds in egg, letting excess drip off, then dredge in bread crumbs, pressing lightly to adhere. Chill 15 minutes.
Whisk together vinegar, salt, mustard, sugar, and a pinch of pepper in a small salad bowl. Add 1 tablespoon oil in a slow stream, whisking until emulsified.
Heat remaining teaspoon oil in a small nonstick skillet over moderately high heat until hot but not smoking, then sauté cheese until golden, about 30 seconds per side. Remove skillet from heat.
Add greens to dressing and toss gently to coat. Serve salad topped with warm cheese and almonds.

Wednesday, September 28, 2011

Cumin & Chili Shrimp with Roasted Corn & Poblano Polenta


I love everything about cumin. The nutty, warm flavor it brings to each dish heightens the taste of every bite. The hubs tends to think that I add too much cumin when cooking sometimes but I just can't help myself.

When I came across this post from Elly Says Opa, I knew that it would become a favorite in our house. We really like trying new things with shrimp since it is healthy and so easy to prepare; and since discovering that polenta is really easy to make, we've been trying various versions ever since. The Mexican twist on the dish is fun and this would be a great meal to make the next time you have company over.

Cumin and Chili Shrimp with Roasted Corn and Poblano Polenta
from Elly Says Opa

For the shrimp:
Olive oil
1 lb. raw shrimp, peeled and deveined
1 T cumin
1/2 T chili powder
1/2 T ancho chili powder

Heat olive oil in a skillet over medium heat. Toss shrimp with cumin and both chili powders in large bowl. Add to skillet and saute for 2-3 minutes, or until shrimp is transparent and cooked through. Serve over polenta.

For the polenta:
1 poblano pepper
3/4 cup roasted corn
2 tsp. butter
1 clove garlic, minced
1-2/3 to 2 cups chicken broth (depending on how thick you want the polenta)
1/4 tsp. paprika
1/2 cup yellow cornmeal
1/4 cup Monterrey jack cheese
Salt and pepper

Over a gas burner or under your broiler, char the poblano on all sides, until the skin is blistery and black. Put in a bowl and cover with plastic wrap. Once cooled, peel and dice.

Heat the butter in a small saucepan over medium heat Add the garlic and stir until just fragrant. Stir in the chicken broth, paprika, and salt and pepper to taste; bring to a boil. Slowly whisk in the polenta – it will absorb the liquid almost immediately. Add the diced poblano and corn. Reduce the heat to low and continue to simmer, stirring frequently, until cooked, about 10-15 minutes.

Off the heat, stir in the cheese and reseason if necessary.

Serves 2

Monday, September 26, 2011

Restaurant Review: BRGR Kitchen+Bar


Gourmet burgers are all the rage right now. Burger places have popped up all over Kansas City in the past year, from locally owned joints to the corporate-owned chain versions. We've tried quite a few, but hands down our favorite place to go is BRGR Kitchen+Bar. BRGR has a wide array of burgers and sides. From traditional to adventurous, you really can't go wrong. They also make their own ketchup and mustard, which makes it even more unique.

S&P Burger
 This time around, I tried the S&P which is more on the traditional side. For me, a true test of a restaurant is if they can get the simple things right. The S&P has lettuce, tomatoes, with your choice of cheese on a kaiser bun. I had mine medium-rare with cheddar cheese. The burger was perfectly juicy and filling, I could actually only eat half.

Juicy Lucy
The hubs decided on the Juicy Lucy, which is actually stuffed with American cheese. The flavors of worcestershire really came through in each bite and was a great compliment to the cheese.

The Combo
For our sides, we went with the sweet potato fries, onion straws and truffle tots. All three were fantastic, but our favorite were the onion straws. They were cut so thin, seasoned well and perfectly crisp. I prefer my fries to be a bit more crispy than the sweet potato version that we had, but they were still pretty good. As far as the truffle tots go, they were crisp and delicious. We would order them again for sure.

BRGR is a great restaurant, with wonderful atmosphere and delicious food. If you're ever craving a burger, I would recommend giving it a try!


Friday, September 23, 2011

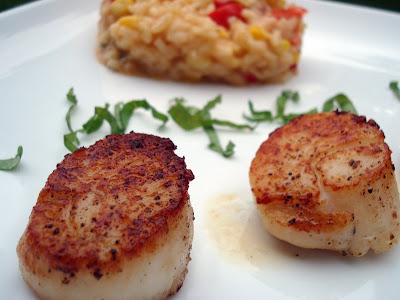
Red Pepper & Corn Risotto with Seared Scallops

Risotto is something that takes time. And love. And more time. It's not something that can be rushed and should more than likely be made on a weekend night while sipping a glass of wine. Or two. Or three.

The hubs has gotten to the point that his risotto is pretty much perfect. Its taken lots of practice (and more nagging from me than he would like because it does take so long to make), but the end result is so worth it. It's definitely possible that the first time you try cooking risotto, it could be an utter failure. I encourage you not to give up. Risotto is a dish that warms the soul and its worth all of the time and effort that goes into it.

For this version, we made a red pepper and corn risotto served with seared sea scallops. The recipe below is for a larger group, but can be scaled down to accommodate a smaller crowd; however I recommend making the risotto as is because you just can't go wrong with leftovers.

Red Pepper and Corn Risotto

1 cup diced red pepper
1 cup corn, removed from ear
8 cups chicken stock
Bouquet garni (Rosemary, thyme and bay leaf in cheesecloth)
1 medium shallot, minced
2 cloves garlic, minced
1 T butter
1 1/2 cups arborio rice
1 cup dry white wine (We use chardonnay)
3/4 cup Parmesan cheese
1 T fresh basil chiffonade

In medium skillet over medium heat, add olive oil, red pepper and corn until cooked through. Remove from heat and set aside. 

Add chicken stock and bouquet garni to a large saucepan and heat over medium heat until simmering. In a separate large saute pan over medium heat, add olive oil, butter and shallots. Cook shallots until soft, for 5 minutes, then add garlic, stirring frequently. Add arborio rice to shallot and garlic mixture and continuously stir until rice is toasted, about 5 minutes. Add white wine and stir as wine is absorbed into rice. Add one ladle of stock at a time, while continuously stirring. Continue to add ladles of stock every 5 minutes or until rice is fully cooked. Add red peppers, corn, and Parmesan stirring to combine. Season to taste with salt and pepper.

Add to plate and sprinkle basil on top of risotto. Serve alongside scallops.


Seared Scallops

18 large sea scallops
Extra virgin olive oil
Kosher salt
Fresh cracked pepper

Start by rinsing scallops under warm water. Pat completely dry. Season each scallop liberally with salt and pepper. Add olive oil to a cast iron skillet over high heat. Once pan is to temperature, add scallops and sear each side for 1-2 minutes. Remove from heat and serve with risotto.

Serves 6


Monday, September 19, 2011

Grilled Romaine Salad


Grilling is one of my favorite things during the summertime for the obvious reasons. It's tasty, easy to clean up and I love the flavor of anything we cook on it. The hubs is old school--he had a huge charcoal grill that doubles as a smoker and prefers not to cook with gas on the grill. While it is a little more time consuming, I believe the wait it worth it when the food comes off the grill.

Doing the same old chicken, pork, etc. can get a little boring come summer's end, so a couple of weeks ago we decided to try doing a grilled romaine salad. It sounds a bit strange, but I definitely recommend giving it a try. The leaves get a perfect little char on them but still stay nice and crunchy. For this version, we added some smoky bacon, grilled corn, blue cheese and a balsamic vinaigrette. You could make this a ton of different ways--next time I want to try a more citrus-y version and add some grilled salmon on top.


Grilled Romaine Salad
1 head romaine lettuce
2 T. extra virgin olive oil
1 ear corn
1/4 cup bacon, diced
2 T. blue cheese
1/4 cup balsamic vinegar
1/2 cup extra virgin olive oil
Salt
Pepper

Half romaine head lengthwise and brush with olive oil. Use remaining olive oil and brush over corn ear. Add both romaine lettuce, split side down, and corn to grill. Remove romaine from grill once leaf edges begin to char. Rotate corn on grill until all sides are cooked completely.

While lettuce and corn rest, combine balsamic vinegar, EVOO and a dash of salt and pepper and whisk to combine.

Once dressing is made, remove corn kernels from cob. Top romaine halves with corn, bacon, blue cheese and balsamic.

We served this alongside some other grilled veggies for a lighter meal, but this would be good with steak or pork chops as well.

Serves 2

Monday, September 12, 2011

Romesco Shrimp & Goat Cheese Polenta


Polenta was something that I had eaten a few times while out at fancy dinners, so I assumed it was difficult to make. It's one of those things that can be a major failure if you don't get the right consistency so I had always shied away from attempting it at home. The more I read about it, the more I got the courage to at least try making it once. The funny thing is that I couldn't have been more wrong. Polenta is actually very easy to make. Another plus is that it can take on so many different flavors, depending on how you prepare it.

I was inspired by a post that I saw from Cara's Cravings, pairing goat cheese polenta with shrimp in a romesco sauce. I made a few changes to her version but was still very happy with the results.

Shrimp in a Romesco Sauce with Goat Cheese Polenta
adapted from Cara's Cravings

Shrimp in Romesco Sauce:
1 lb uncooked large shrimp, peeled and deveined
1 large red pepper
1/2 tablespoon olive oil
1/2 cup chopped onion
1 clove of garlic, minced
1 large tomato, cored and seeded
1 slice white bread, crust removed
2 tablespoons sliced almonds
1/4 teaspoon smoked Spanish paprika
1/4 teaspoon crushed red pepper
2 tablespoons chopped parsley
1 tablespoon sherry vinegar
1/3 cup chicken broth

Start by roasting the red pepper. I set my oven to 450 degrees and placed the pepper directly on the oven rack and roasted for 10-15 minutes. Once roasted, place in a bowl and allow to cool (I put mine in the fridge). Peel the skin from the pepper and remove the seeds and then chop into pieces. The alternative is to buy jarred roasted red peppers and skip this step entirely.


While the red pepper is roasting, heat the olive oil in a skillet over medium-low heat, and cook the onions until softened, about 10 minutes. Add the roasted pepper pieces, and continue cooking for about 20 minutes, stirring occasionally, until the peppers are very soft and the onions are caramelized. Add the the tomato, bread, garlic and almonds, and cook for about 5 minutes, until the almonds are lightly browned and fragrant. Add the paprika, red pepper, parsley, vinegar, and chicken broth and simmer for a few more minutes, to blend flavors. Use immersion blender to combine ingredients into a chunky sauce. Add shrimp to sauce and simmer until cooked through.

Goat Cheese Polenta:
2 cups chicken broth
1 cup yellow cornmeal
2 oz goat cheese
Salt
Pepper


Heat chicken broth in medium saucepan until boiling. Remove from heat and slowly whisk the cornmeal to the broth until smooth. Stir in goat cheese and season to taste with salt & pepper.

Divide polenta among serving plates and top with shrimp, romesco sauce and chopped parsley. Enjoy!

4 Servings


Wednesday, August 24, 2011

Brussels are the best!

I don't think that I've ever shared my love for Brussels sprouts. At least on this blog...friends, family, co-workers have all heard how much I love them. It was about time I shared my love of them with the interwebs. Brussels sprouts can be prepared in a multitude of ways. Crispy, sauteed, and even fried. One of my good friends makes a nice, creamy version with bacon that are delish. However, when I fix them at home, I prepare them in the simplest manner possible--roasted in the oven. Roasting brussels sprouts in the oven is just perfect--each little sprout is the perfect mix of crunchy but soft at the same time. And don't even get me started on the crispy little leaves that fall off the sprout and carmelize in the oven. Ah! I just can't get enough!

When picking out your Brussels sprouts in the grocery store, look for the ones that are a good green color, are firm and have compact leaves. Avoid those that look puffy and have yellow or holey leaves on the outside.


Roasted Brussels Sprouts
Serves 2

15-20 Brussels sprouts, stems removed and quartered
Extra Virgin Olive Oil
Balsamic Vinegar
Salt
Pepper

Preheat oven to 375 degrees. Add Brussels sprouts to a large bowl and drizzel with olive oil and balsamic vinegar until well coated. Add salt and pepper and toss to cover. Add sprouts to baking sheet lined with foil and roast for 15-20 minutes or until caramelized.

Friday, July 22, 2011

Crispy Onion Straws

I’m going to start this post with a disclaimer: please look away if you are on a on a diet, trying to watch what you’re eating, or just don’t like very delicious but not so good for you things. For those of you still reading (which I’m assuming is the majority—who doesn’t like a little indulgence every once in a while?), I’m excited to share this recipe with you. Being the foodies that we are, the hubs and I often try things in restaurants that we love but know that we can make at home. This is definitely the case for these onion straws. About a month ago, we were dining at one of our favorite Kansas City burger joints, BRGR, and ordered onion straws as a side to our burgers. And we fell in love. They were the perfect amount of salty and crispy goodness.

The next time we were making burgers at home I was determined to recreate those onion straws knowing, that it couldn’t be that hard. I remembered seeing The Pioneer Woman post her version and decided to try it out—specifically because the recipe included a touch of cayenne. And let me tell you, these were perfect.


adapted from The Pioneer Woman

1 whole Large Onion
2 cups Buttermilk
2 cups All-purpose Flour
1 Tablespoon Salt
1 Teaspoon Cayenne Pepper, divided in half
1 quart (to 2 Quarts) Canola Oil
Black Pepper


Slice onion into thin half circles (almost transparent). Add buttermilk and ½ teaspoon cayenne pepper in a baking dish. Add onions and soak for 30 minutes to an hour. Combine dry ingredients and set aside.


Heat oil to 375 degrees. Grab a handful of onions, throw into the flour mixture, tap to shake off excess, and add to hot oil. Fry for a few minutes and remove as soon as golden brown. Sprinkle cooked onions with salt and pepper. Enjoy.

Monday, May 24, 2010

Mediterranean Herbed Chicken Kabobs

So, this post isn't very exciting...my camera died right as I was preparing to take pictures of this dish. No worries though, it was so yummy that I will be making it again (and making sure the camera is charged). We're a big fan of anything Mediterranean, so this was right up our alley. Served with grilled zucchini, couscous and tzatziki, it's a great weeknight meal.

adapted from Joelen's Culinary Adventures
3-4 pounds boneless skinless chicken breasts
4 medium cloves garlic, minced
2 tablespoons grated lemon zest
juice of 1 lemon
1/4 cup olive oil
1/4 cup fresh parsley leaves, minced
1 tablespoon fresh thyme, minced
1 tablespoon fresh sage, minced
1 tablespoon fresh rosemary, minced
bamboo skewers

Place the bamboo skewers in a shallow dish and cover with water to soak before using.

Cut the chicken into bite sized cubes and place in a gallon sized storage bag.Place the garlic, lemon zest, lemon juice, oil and herbs into the storage bag along with the chicken. Allow the chicken to marinate for 20-30 minutes.

Remove the bamboo skewers from the water and begin skewering chicken. Place the skewers on a hot grill until chicken is fully cooked.


Tzatziki Sauce
 
1 cup plain yogurt
1/2 large cucumber, seeded and chopped
zest of 1 lemon
juice of 1 lemon
1 T minced garlic
1/4 cup fresh rosemary leaves
1/4 cup fresh parsley leaves
1/4 cup fresh thyme leaves
Salt
Pepper
Place all ingredients in the bowl of a food processor and process until smooth. Chill for at least 30 minutes before serving over grilled kabobs.

Tuesday, September 8, 2009

Sunday Night Dinner: Surf and Turf

Sunday evenings are the time of the week Dave and I have decided to reserve for each other. It's a great opportunity for us to catch up before the busy week starts and spend some quality time together. Most Sunday evenings, we spend our time in the kitchen cooking a nice dinner and enjoy it with a glass (or two!) of wine. This past Sunday was no different.

I had ran errands on Friday and made a stop at Sam's to pick up dog food. Of course, no trip to Sam's is complete without perusing through the grocery area to try out a few samples and that's exactly what I did. Last time I was home, my mom had mentioned that Sam's offered fresh seafood on Friday's and Saturday's...low and behold as I picked up my pita chip with hummus sample, the seafood station was in sight. They had some lovely ahi tuna, shrimp and huge king crab legs.

As I was taking a look at the crab legs, the person working the station had just pulled together a one-pound bag and said "I would jump on these if I were you, they're the best ones of the day." She must have seen my huge eyes and knew that she could take advantage of my weak moment. But, hey, it was a holiday weekend and at $16.99/lb I figured it would be a good meal to celebrate the end of summer. Or at least that's what I told myself at the checkout line.

Cooking crab legs really isn't all that difficult, as most people just steam them for a few minutes and serve with butter or lemon juice. While that is a great method of preparation, we were looking for something a bit more unique that would give the meat even more flavor. That's when I stumbled upon Emeril Lagasse's Drunken Alaskan King Crab recipe on Food Network. Seriously...what could be better than crab steamed with beer? Since crab is the one of the components in Steak Oscar, it was decided that we would go all out for the evening and splurge on filets as well and serve them with a side of homemade mashed potatoes and roasted asparagus. Dave happened upon this Wolfgang Puck recipe and used it for inspiration for our meal.

In keeping with the fancy theme, the night started with dirty martinis to enjoy while we were prepping in the kitchen (or just waiting for water to boil).

Olives. Vodka. Yummy.

Next, came the choron sauce prepartion. While I am a lover of anything that is vinegar-based, the aroma from reducing the wine and vinegar combination was too much for me to handle. Luckily, Dave is much tougher than me and manned the kitchen while I was trying to catch my breath outside.

Sauce. Reducing.

A couple drinks and about an hour later, the masterpiece was complete.

While it was a lovely Sunday meal, I think that it was a bit too much food for us (and we even split the filet pictured above!). I would definitely recommend Emeril's method of steaming the crab with beer rather than water and we'll probably be trying it again in the near future. Next time, we'll just save the steak for another night :)